
In this article I want to cover several examples of impeller failure along with steps for changing your impeller yourself. It is a basic task across the board, but I will cover all engines from a generator to an outboard engine. There are several examples of impeller failure such as overheating due to lack of water intake, lack of maintenance, restrictions in the raw flow, and hub or keyway failure. It is very important to change your impeller every other year if your boat stays in the water and I advise yearly on trailer boats. Products aren’t being made like they used be and an impeller is a rubber material that will break down over time. This is why I recommend trailer boats get changed yearly because these impellers get wet and then dry over and over throughout the season and you don’t want to have an impeller failure mid-season. An impeller failure will cause the engine to overheat and if that does happen you are looking at way more of a cost than just an impeller change. The damage caused by impeller failure are anything from having to spend hours digging out impeller fins and pieces to replacing a whole engine.
I want to start with the basics, in this example I will be using a westerbeke and a kohler generator. The red one is a westerbeke and the white one is a kohler. Note the kohler has a keyed shaft and the westerbeke has a slotted shaft. Both have 4 8mm bolts that hold the cover on, they need to be removed first. Make sure and observe the condition of the impeller, such as are there any fins or pieces missing. If so, the pieces need to be located prior to new installation so there will be no restriction on water flow within the system. Start on the outbound side of the pump and follow the hose to the heat exchanger, most of the time there is a honeycomb section you will see if you remove the inbound hose. If there is then more often than not this is where all the missing pieces will be. If not keep moving down the line until the pieces are found. Then using an impeller puller remove the impeller, sometimes you may have to use a flat head screwdriver for help. Use dish washing liquid and coat the entire housing lightly, soap is used to ensure that you have water flow once the engine is started. Install the gasket and bolts and test. People have asked me in the past how do I know if the impeller fins are facing the right way? Well, that doesn’t matter, the soap also helps move the fins to the right direction upon start up. Verify water flow and no water leaks.


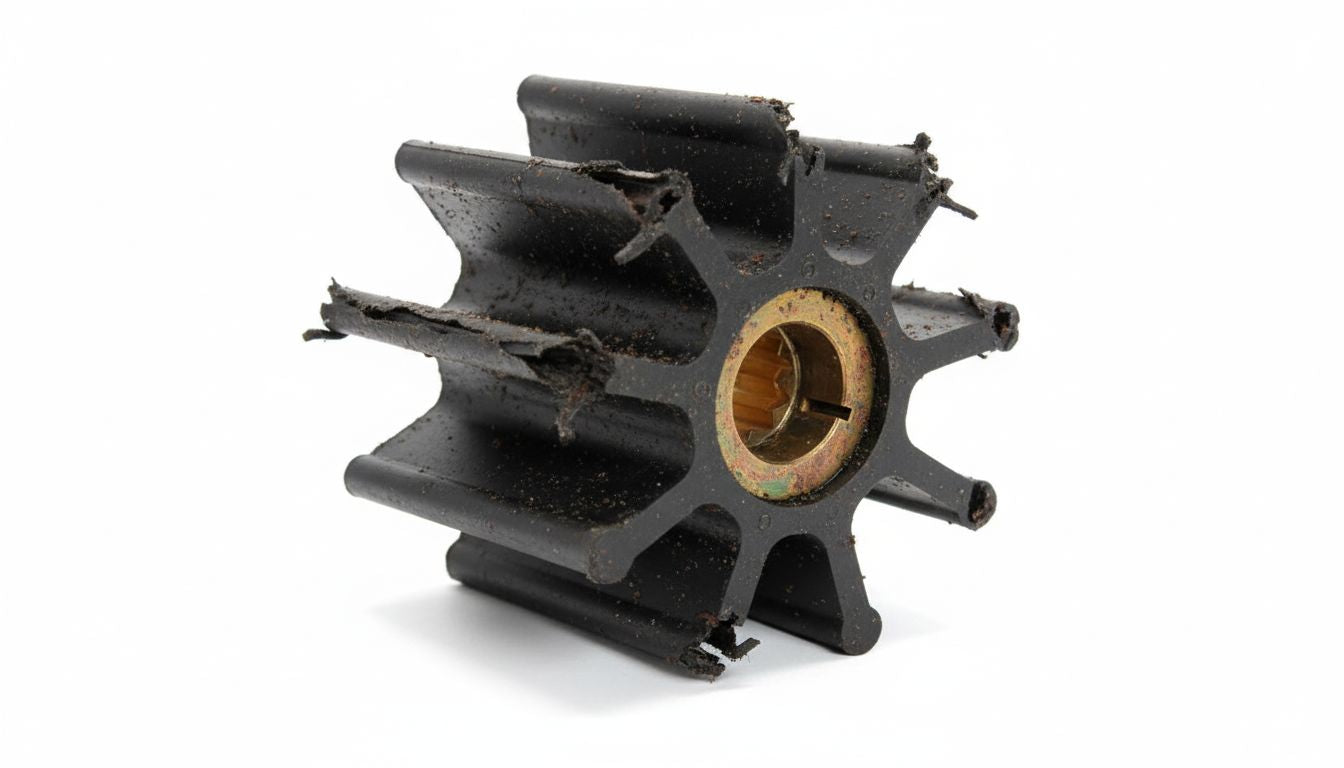
On inboard or some stern drive engines the impellers are located on the engine in a housing with a pulley that is run by a belt and drawing water from a thru hull or outdrive. In this example I will use a crusader engine and a mercruiser bravo one. The crusader will be blue and the mercruiser will be black. The crusader is painted blue and the mercruiser is black. The same steps are taken to change these impellers as with the generators. Remove the bolts that hold the back plate on, remove the cover and the impeller and reinstall. The crusader picture is the installation of a new impeller, it has a keyed spline. The first mercruiser picture is an impeller that has not been changed in a number of years and has overheated. The picture to the far left is a new impeller installed on the mercruiser.


On an outboard things will be a little different. The engine needs to be placed in forward in order to assist in getting the prop shaft lined back up during reinstallation. You will remove the bolts holding the lower unit on they will vary in locations according to the manufacture. Usually, you will have 2 on each side of the engine and one in rear. I will use mercury for this example. Remove the 4 bolts holding the lower unit on next remove the anode from the rear of the lower and you will see another bolt holding the lower on. Once all bolts are removed, wiggle the lower unit loose from the engine and it will slide out. Remove the 4 bolts holding the impeller housing on and remove the housing. Next remove the impeller, be careful not to lose the key for the keyway. Then remove your lower plate and gaskets, clean all areas thoroughly. Install your lower gasket and then the plate, then the upper plate gasket. Now reinstall the key and impeller, if you are replacing the wear cup inside the housing do so at this time. Use a flathead screwdriver and pry up around the cup and it will come out. When reinstalling be sure to line the tab on top of the cup up with the slot in the housing and press in by hand. Use some grease or liquid dish detergent and apply a light coat into the housing. Slide the housing down the driveshaft onto the impeller. You can turn the prop if needed to allow the impeller to seat into the housing, then reinstall the bolts. When installing the lower unit keep one hand on the prop where it can be turned in order to line up the splines with the ones on the engines and slide it all the way up until it contacts the midsection. Below are examples of impellers that have been ran dry and overheated.