
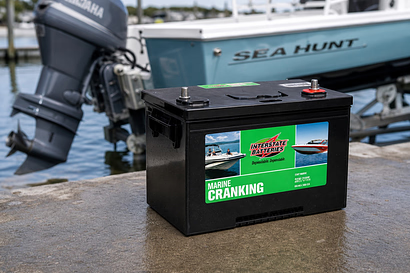
The right marine battery depends on one thing: the job you are asking it to do. A battery built to start an engine is designed differently from one built to run electronics all day, and picking the wrong style is the most common reason boaters find themselves stranded at the ramp with a battery that will not turn the motor over. This guide walks through the three battery types, the chemistry choices behind them, how to read the ratings on the label, and how to size and install a battery so it lasts.
Start With the Job: The Three Marine Battery Types
Every marine battery falls into one of three families. Match the family to how you actually use your boat and most of the decision is already made.
Starting (Cranking) Batteries

A cranking battery is built to deliver a large burst of current for a few seconds to spin the starter and fire the engine. It does this with many thin plates that maximize surface area. That design is excellent for starting and poor at everything else. Draw a starting battery down repeatedly to power a fridge or a fishfinder and it will fail early. If your boat has a dedicated start battery and a separate house bank, this is the battery for the engine.
Deep Cycle Batteries

A deep-cycle marine battery is the opposite. It uses thicker, denser plates that give up their energy slowly and, more importantly, survive being discharged and recharged over and over. This is the battery that runs trolling motors, electronics, lights, pumps and cabin loads. You size it by capacity, not by cranking power. Anglers running a bow-mount trolling motor and a stack of electronics live and die by their deep cycle bank.
Dual-Purpose Batteries

A dual-purpose battery is a compromise built to both start an engine and handle moderate cycling. It will not crank as hard as a dedicated starting battery or cycle as deeply as a true deep cycle, but for a simpler boat with a single battery and modest accessory loads it is often the practical choice. If you run one battery for everything, a quality dual-purpose unit is usually the right call.
Reading the Label: CCA, MCA, Reserve Capacity and Amp-Hours
Battery labels are covered in acronyms, and knowing four of them tells you almost everything you need.
Cold Cranking Amps (CCA) measure how many amps a battery can deliver for 30 seconds at 0 degrees Fahrenheit while holding a usable voltage. It is a cold-weather starting number. Marine Cranking Amps (MCA) run the same test at 32 degrees Fahrenheit, so for the same battery the MCA figure lands roughly 20 to 25 percent higher than the CCA figure. Most warm-water boaters compare batteries on MCA, but check which rating a manufacturer is quoting so you are comparing like with like.
Reserve Capacity (RC) is a deep cycle number. It is the number of minutes a fully charged battery can supply 25 amps before it drops to a cutoff voltage. Higher reserve capacity means longer runtime for your house loads. Amp-hours (Ah) describe total capacity, usually measured over a 20-hour period. When you are sizing a house bank, amp-hours are the currency you will work in.
One more idea ties these together: depth of discharge. Traditional lead-acid batteries should generally not be run below about 50 percent of their capacity if you want a long service life. That means a 100 amp-hour lead-acid battery really only gives you about 50 usable amp-hours. Lithium changes that math, which brings us to chemistry.
Battery Chemistry Compared
Type tells you what the battery is for. Chemistry tells you how it is built, what it weighs, how long it lasts and what it costs. The four you will see on the water are flooded lead-acid, AGM, gel and lithium (LiFePO4). Treat the figures below as typical, because exact numbers vary by brand and model.
|
Chemistry |
Upfront cost |
Usable depth of discharge |
Weight |
Maintenance |
Typical lifespan |
|---|---|---|---|---|---|
|
Flooded (wet cell) |
Lowest |
Around 50% |
Heavy |
Needs water top-ups and ventilation |
Shortest |
|
AGM |
Moderate |
Around 50% for long life |
Heavy |
Sealed, no watering |
Moderate |
|
Gel |
Moderate |
Tolerates deep discharge |
Heavy |
Sealed, needs a gel charge profile |
Good, strong in heat |
|
Lithium (LiFePO4) |
Highest |
Around 80% to 100% |
Lightest |
Minimal, managed electronically |
Longest, often thousands of cycles |
Flooded batteries are the value option and still power plenty of boats, but they need care and airflow. AGM is the popular middle ground: sealed, vibration resistant and happy with most standard marine chargers. Gel handles heat and deep discharge well but is fussy about charging. Lithium costs the most up front and usually needs a lithium-specific charger, but it is dramatically lighter, gives you far more usable capacity and lasts for many more cycles. The AGM vs lithium marine battery decision usually comes down to budget today versus weight and lifespan over the long run.
What the Group Number Really Means
Batteries are sold by group size, and the numbers you will meet most often on a boat are Group 24, Group 27 and Group 31. Here is the part that trips people up: a group number describes the physical case size and terminal layout, not the capacity or the chemistry. It exists so a battery drops into your existing tray, sits under your hold-down and lines up with your cable runs.
-
Group 24: the most compact of the three, a common fit on smaller boats where space is tight.
-
Group 27: a step up in length, offering more capacity for house duty in the same height.
-
Group 31: the largest and highest capacity of the three, a workhorse for demanding house banks.
Because a bigger group usually holds a bigger, higher-capacity battery, moving from a 24 to a 27 to a 31 generally buys you more amp-hours and more cranking power. Just confirm the new battery physically fits and that you have a tray and box to match. Measure your compartment before you shop.
Sizing a House Bank
If your boat has a dedicated house bank, sizing it is simple arithmetic. Add up the amps each device draws, multiply by the hours you expect to run it between charges, and you have your daily amp-hour demand. Then divide by your usable depth of discharge to find the raw capacity you need. For lead-acid, divide by roughly 0.5. For lithium, you can divide by something closer to 0.8. Finally, add a comfortable margin so you are never running the bank flat.
A quick example: if your loads total 60 amp-hours a day and you are running AGM at a 50 percent depth of discharge, you need at least 120 amp-hours of installed capacity, and more if you want reserve for a long night at anchor. If you are building or rewiring a bank from scratch, our guide to basic boat wiring and troubleshooting is a useful companion read.
Installing and Managing It the Right Way

A battery is only as good as its installation. Marine electrical guidance from ABYC is clear on the fundamentals, and they are worth following whether or not an inspector is involved.
First, secure the battery so it cannot move. A battery sliding around in a seaway is a hazard. That means a proper battery tray with a rigid hold-down, or a covered marine battery box that both restrains the battery and shields the terminals. Browse trays, boxes and straps in the battery boxes and straps collection and match the box to your group size. Second, protect the terminals so a dropped tool cannot short across them, which a covered box handles neatly. Third, keep the compartment ventilated, especially with flooded batteries that release gas while charging.
Once the battery is mounted, the way you switch and charge it determines how long it lives. If you run more than one battery, a battery switch lets you isolate the start battery from the house bank so a long evening of music never leaves you unable to start the engine. Explore options in battery selector switches, and if you want the start and house banks to charge together but discharge separately, look at a battery isolator or automatic charging relay.
One of the cleanest ways to manage two banks on a small boat is a ready-made kit. The Blue Sea Systems Add-a-Battery kit pairs a dual-circuit switch with an automatic charging relay, so your charging source tops up both batteries while keeping the engine start battery reserved. We walk through exactly how it works in our Blue Sea Systems Add-a-Battery article.
Finally, charge for the chemistry you chose. A charger set for flooded batteries will not properly service gel or lithium, and the wrong profile shortens battery life. Find shore chargers and maintainers in battery chargers, and if you are rethinking how power is distributed around the boat, our overview of marine electrical panels and DC systems ties the whole picture together.
Wiring and Maintaining Your Bank
How you connect your batteries matters as much as which ones you buy. Two 12-volt batteries wired in parallel, positive to positive and negative to negative, keep the voltage at 12 volts while doubling the amp-hours, which is the usual way to grow a house bank. Wiring in series instead, positive to negative, adds the voltages, so two 6-volt golf-cart batteries in series make a 12-volt bank with real deep-cycle staying power. Whichever route you take, use correctly sized, tinned marine cable so the heavy currents flow without voltage drop, and keep every connection clean and tight. Browse battery cables and battery terminals and lugs to finish the job properly.
Once it is installed, a few habits get you the full life out of any battery. Recharge as soon as you can after a discharge rather than leaving a battery sitting low, since a lead-acid battery left partly discharged slowly loses capacity. Avoid running any battery flat. And when the boat is laid up, keep the bank topped up with a maintainer rather than letting it self-discharge over the off-season. These small routines add years to a battery that would otherwise fade early.
Putting It All Together
Choosing a marine battery is really three quick decisions. Pick the type that matches the job, whether that is a hard-cranking starter, a deep cycle for house loads or a dual-purpose unit for a single-battery boat. Pick the chemistry that fits your budget and your priorities on weight and lifespan. Then pick a group size that fits your space and your capacity target. Get those three right, install the battery so it is secured, protected and ventilated, and manage it with the correct switch and charger, and you will spend far more time on the water.
When you are ready to build out the power side of your boat, start with the full batteries, chargers and accessories collection at Go2Marine, and reach out to our team if you want a second set of eyes on your setup before you buy.