Vaccuflush Toilet Repair: Step-By-Step Guide on Diagnosing and Repair
Written by Todd S. Go2marine/LFS Tech Support
If you are having issues with your head such as: the vacuum pump is running constantly, vacuum pump is cycling over and over, or no water holding in the bowl use these step by step instructions on diagnosing and repairing these systems.
Tools needed
- Vacuum gauge
- Phillips screw driver
- 8mm nut driver or socket
- 7/16" Socket with 6" extension
- 3/4" Socket
- Channel Lock Pliers
- 2-4-C Grease
Diagnosing Vaccuflush Problems
Lets start by isolating the problem. If the vacuum pump is constantly cycling or constantly running, turn the fresh water supply off. Hold the foot peddle down with the system on and place the rubber cone end of the vacuum gauge inside the discharge pipe. Watch the action of the gauge, one of two things will happen. If the pump builds up enough pressure to shut off, allow the gauge to sit there for several minutes and observe if the vacuum drops or if the pump kicks on again.
If the pressure is maintained and the pump doesn’t cycle, then the bowl seals and the ball need replaced. If the gauge drops pressure and the pump cycles again or doesn’t shut off, then it is on the pump end. Keep in mind if you have a bowl that is not holding water that is a sure sign of bowl seals and a ball kit. I always recommend replacing the ball when changing the bowl seals due to the ball having any slight imperfections. If it does then the seal will just get damaged again.
Bowl Seals
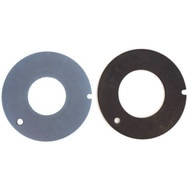
When replacing the bowl seals start by turning off the fresh water system, then remove the decorative plastic trim if applicable. Next there will be a large hose clamp holding the two pieces that join the toilet to the base. Remove that clamp and lift the toilet off the base. That will expose the bowl seals, there are two seals one will be blue in color and one black. The blue one will go on first and the black next. The black one will indicate which side is to be installed facing up. When installing the seals use the grease around the points of contact with the ball
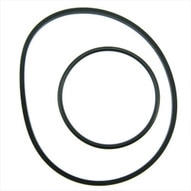
Bowl Seal Kit
Ball Replacement
While the toilet is off of the base and the seals have been removed you will want to replace the ball and spring which is sold in as a kit. To do this you will remove the plastic piece that covers the peddle first, it will have two small phillips head screws on the inside of the cover. Make sure to check if your peddle is metal or plastic before ordering a ball kit, there are different spring mechanisms depending on application. The black spring cartridge kit is for plastic pedals and the clear cartridge kit is for metal pedals. The clear is the most common kit.
Ball Kit
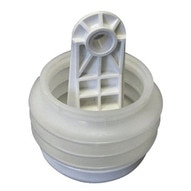
Cartridge Replacement

After the trim is removed you will see a phillips head screw in the center of the cartridge, remove that screw. Then you will have two 8mm bolts on each side of the cartridge. Remove those and the cartridge and the pedal will come off. Turn the ball over until the top of the ball is facing the discharge pipe, that will expose the phillips head screw that retains the ball shaft. Remove that screw and push the shaft from the outside where the cartridge was removed to the inside of base. Then using a flathead screw driver pry the opposite side out of the pocket holding it into the base and use a pair of pliers to pull the ball out.
Reassembly
Do the same in reverse order to reassemble. Install the ball, when installing the shaft use some grease to grease the two O-rings on the shaft. When installing cartridge, rotate the ball to where it is facing up and you will have to move the ball around a bit to line up the square the cartridge with the square on the shaft. Do not force it, it will damage the mechanism. Do not forget to install the pedal prior to the cartridge also! Reinstall the seals as indicated and then the toilet to the base.
Vacuum Generator Repair
If the vacuum generator is the issue you can work on it one of two ways depending on access. The whole unit can be removed by removing the inlet and outlet hoses or you can remove just the pump assembly. If the pump assembly only needs to be removed that can be done by removing both sides of the pump from the tank and removing four 7/16" bolts that hold the pump to the tank. You will also need an O-ring kit to use when mounting the motor to the tank.
If you are rebuilding the whole pump, you will need a bellows kit, O-rings and duck bills. I recommend replacing at least the duck bills every two years as a maintenance item. To disassemble the pump, you will remove the motor by removing four 8mm screws and the 3/4" bolt holding the bellows to the motor. Hold the bellows at the top with the pliers and remove the bolt. After the motor is removed, take out the remaining 8mm screws holding the top of the pump housing to the base and remove the bellows and old O-rings. Clean the housing and top very well prior to reassembly. Install the new bellows into the housing, apply grease to the O-rings and install. Reattach the lid to the housing, the grease will allow the O-rings to seat into the housing easier. Reinstall the housing screws, the motor and the bellows bolt.
Duck Bill Replacement
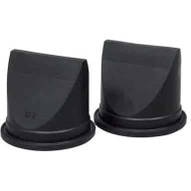
Depending on pump model you will have either 1 1/2" or 2" duck bills. There are four duck bills for every system. Their location is at the inlet and outlets of the pump. They will be visible upon removal of the pump from the tank. Remove the fitting that contain the duck bills and replace the duck bills, do not over tighten the fittings these housings are plastic and will crack!!
1 1/2" Duck Bill2" Duck Bill